Quilt & Sew Ruler
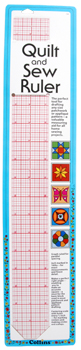
The Quilt and Sew Ruler is the perfect tool for drafting any size patchwork or applique pattern. It is also a valuable measuring aid for all home sewing projects. It is made of clear- see-through- flexible plastic- with laminated permanent printing. It is a graph ruled -inch is marked in 16th- and it has a zero centering scale with holes pierced every 1/2 inch. These special features eliminate the need for graph paper- compass and the draftsman triangle when drafting patterns for your quilting projects.
Item Number: C96
Instructions:
Some basics uses for the Quilt and Sew Ruler with drafting a pattern are as follows: A. BLOCK - Decide what size block you want and make a square that size. Exp: 1. If block is 8 inch square draw a base line slightly longer than 8 inches Place any of the bold lines on ruler directly over base line close to one end. Draw a straight line up the side of the ruler bisecting baseline in order to get perfect corner. Measure 8 inch in each direction and mark with dot. 2. To get third side of square proceed in same manner placing any bold line on ruler directly over line just drawn at 8 inch mark and drawing length of ruler. Measure 8 inch and mark with dot. 3. Finish square by connecting top and bottom where marked with dot. Using any right angle marking on ruler check to be sure all corners are perfect right angles. B.GRID - Divide block (square) into a Grid. Using the parallel markings divide block into a Grid (Grid is the number of equal squares the block should be divided into to suit your patchwork pattern) Exp: 1. This block is divided into a four-patch grid. (4 equal squares - or multiples of four.) 2. Using Quilt and Sew Ruler connect squares up - down and diagonally to get the patchwork design desired. Cut out each piece and make permanent pattern pieces or templates by copying shape on to sturdy brown paper - cardboard - fine sandpaper or thin plastic. Use Ruler to add seam allowances around all sides of each piece. Pattern designs fall into many different grids-books are available explaining this more thoroughly. C. Enlarging Applique Motifs - Patterns (you may want to copy) are often given in magazines - etc. with a scale to indicate their actual size. It is easy to enlarge or reduce them. For instance: If one square - 1/2 inch - use the Quilt and Sew Ruler to prepare a block divided into a grid of 1/2 inch squares - then draw the design square by square. Some motifs will call for the addition of seam allowances. D. CIRCLES & Scallops: Circles: 1. Place sharp pencil heavy pin or thumb tack in hole marked O. 2. Place a second pencil in hole marked half the width you want finished circle.(1 inch - 2 inch circle - etc.) 3. Rotate ruler as you would a compass holding center securely. SCALLOPS - 1. Draw a horizontal line as a guide. 2. Place center hole 0 on line holding in place with a pencil -heavy pin or thumb tack. 3. Place pencil in hole marked half the width of finished scallop.(1 inch -2 inch scallop - etc.) 4. Rotate ruler (as you would a compass) from one side of line to other forming the scallop. 5. Hold pencil in place on line and swing ruler around so center hole 0 is in position on the line for making next scallop. For best results in designing your templates - be sure to ask for Collins No. 97 Template Marking Pencil and Collins No. 98 Plastic Template Sheets.